
The first step in securing your connection to your NAS is providing it with a certificate. A certificate is used to encrypt your connection to the Synology NAS or services that are running on it. For example if you are running the web service on your NAS a certificate would be needed to establish an HTTPS connection. The Synology NAS will create out-of-the-box a self-signed certificate. Certificates are also used to ensure (and certify) that the server you are connecting to is indeed that server. These certificates are seen as insecure, because there is not an independent organization (a certificate authority) saying that the certificate is truthful.
There are several ways to get a valid certificate for your Synology NAS or for your domain. If you register or manage your domain through Cloudflare, in some cases your connection is already certified. When you proxy your DNS record through Cloudflare, Cloudflare will actually provide a certificate for your connection. However when proxying your DNS record is not possible the certificate will not be applied. A second method is to actually buy a certificate from a certificate authority. This is not cheap, for a simple SSL certificate for one domain (that is excluding any subdomain) you can pay 5 euros per year, but for a full wildcard certificate (the main domain and every subdomain) the price can go up to 120 euros a year. With some certificate authorities you would need to provide proof of ID, address and ownership of the domain name in order to receive the certificate. The certificate is most of the time valid for multiple years (5, 10 or 15 years).
Free certificates (Let’s Encrypt)
There are free alternatives that can provide you with an instant certificate that is officially recognized. Let’s Encrypt is one of the largest nonprofit certificate providers. The only drawback is that the certificate is only valid for 90 days. Let’s Encrypt has setup a system to auto renew the certificate when it gets close to its expire date. In order for Let’s Encrypt to certify that you actually own the domain name, it starts from the premise that if you have access to the DNS registration you are the owner or administrator of that domain name. This proof of ownership can be done in several ways, two of which we will discuss and implement here. The first is though an HTTP challenge and the second through a DNS challenge.
A wildcard certificate is a certificate that is valid for all subdomains of a main domain. In order for a certificate to be valid the name on the certificate needs to match the name of the domain that is using the certificate. If the certificate has the name test.org then it is only valid for test.org. If you connect to sub.test.org the certificate is not valid, you would need a separate certificate for each subdomain. The wildcard certificate has as its name *.test.org, which means it is a valid certificate for test.org and sub.test.org.
HTTP challenge
The standard way for Let’s Encrypt to find out if you are the owner is through an HTTP challenge. The Let’s Encrypt client (there are several ones for many different platforms, the ACME protocol being the most popular one), creates in your root domain webserver a temporary folder (_acmeChallenge for example) and places an empty file with a code as name. Let’s Encrypt checks whether the file exists in the temporary folder at the domain, and if this is the case the certificate is generated. The checking of this file is done over http and not https, because the first time you request the certificate the connection to the https is insecure as there is not a certificate yet.
Synology has a built-in Let’s Encrypt client that only works with an http challenge. Which is one of its limitations, another limitation is that it doesn’t allow to generate a wildcard certificate. Also you need to open port 80 (http) from the internet to your Synology NAS. Not all ISP’s allow you to open port 80 or you might not feel comfortable opening that particular port, then this solution will not work
The first step is to open and forward port 80 to your Synology NAS. Make sure your DDNS is working, so your domain name is pointing to your external IP address of your router. Next you go to Control Panel > Connectivity > Security > Certificate and you click on “Add” > “Add a new certificate” > “Get a certificate from Let’s Encrypt” (optionally you can select “Set as default certificate”, if you want it to be assigned automatically to other services that need a certificate”). You can fill in your main domain name and add subdomains that you already want to register. Also enter an email address that will be connected to the certificate (if for some reason Let’s Encrypt cannot renew your certificate, you will get an email when your certificate is almost about to expire).
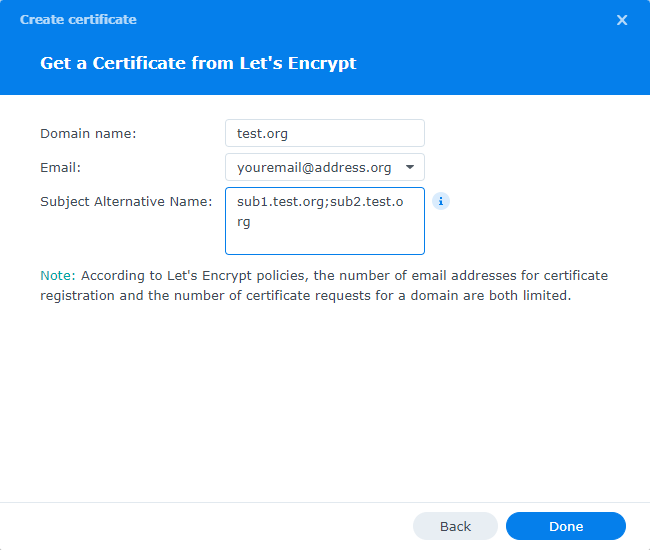
Even though as an example it seems that you can add a wildcard domain (*.example.com is given) in the little “i” you will see that it will only work with the Synology DDNS service. Once you click on done, it will take a couple of seconds for the certificate to show up. If you later on need to have more certificates for other subdomains you can just go through the procedure again, adding another certificate or replacing the current certificate and adding alternative names.
DNS challenge and wildcard certificates
The second method is a DNS challenge. Now the Let’s Encrypt client creates with the DNS registrar a temporary DNS record (often just a text record) with code in it. Let’s Encrypt then checks whether the DNS record was created with the correct code and gives you the certificate. For this you don’t need to open and forward any ports on your router. The limit with this method is that it is not standard present in the Synology NAS and your registrar needs to accept API calls to update the DNS records. Cloudflare allows API calls and therefore works excellent with this method. Many of the steps here are from this website: Automatically renew Let’s Encrypt certificates on Synology NAS using DNS-01 challenge
The first step to take is to setup the Let’s Encrypt client to be able to do the DNS challenge. It is also advisable to use a separate account with administrator rights to update the DNS records. For that you create a user Control Panel > Files Sharing > User & Group click on “Create”. Give the user a name (in our example I created the user certman), give it a strong password. At the next step, make it a member of the group administrator and http. Give it at the next step only Read/Write access to homes, all other directories No Access. At the last step Deny access to all applications.
For the client software you have to make an SSH connection to your Synology NAS with the freshly created user account “certman” (Setting up SSH and connecting to your Synology – Tech Inhortum). Type in the following command separately. This will copy the scripts from a Github site, unzips the script, gives the right access privileges to the folder and enter the folder:
wget -O /tmp/acme.sh.zip https://github.com/acmesh-official/acme.sh/archive/master.zip
sudo 7z x -o/usr/local/share /tmp/acme.sh.zip
sudo mv /usr/local/share/acme.sh-master/ /usr/local/share/acme.sh
sudo chown -R certadmin /usr/local/share/acme.sh/
cd /usr/local/share/acme.sh
The script would need some variables to actually work. These variables will be saved in the script. When the script is used to renew the certificate it will have the variables ready. Depending on your registrar you have to use different variables (dnsapi · acmesh-official/acme.sh Wiki). We will use Cloudflare here.
When setting up the DDNS for Cloudflare you have already created an API token (see Step 3: DDNS with Cloudflare – Tech Inhortum). The API token is only shown once (at creation), so if you didn’t write it down you would need to create a new token with the same settings. These are the commands to get the right variables into the script. These commmands are given at the SSH prompt:
export CF_Token="your API key/token"
export CF_Zone_ID="your zone ID"
export CF_Account_ID="your account ID"
export SYNO_Username="certman"
export SYNO_Password="YOUR CERTMAN PASSWORD"
export SYNO_CERTIFICATE="Give a name for each certificate"
export SYNO_Create=1
The SYNO_CERTIFICATE command is to identify your certificate. If you want multiple certificates, give a different name each time, otherwise it overwrites the default. Your Zone and Account ID of Cloudflare can be found here:
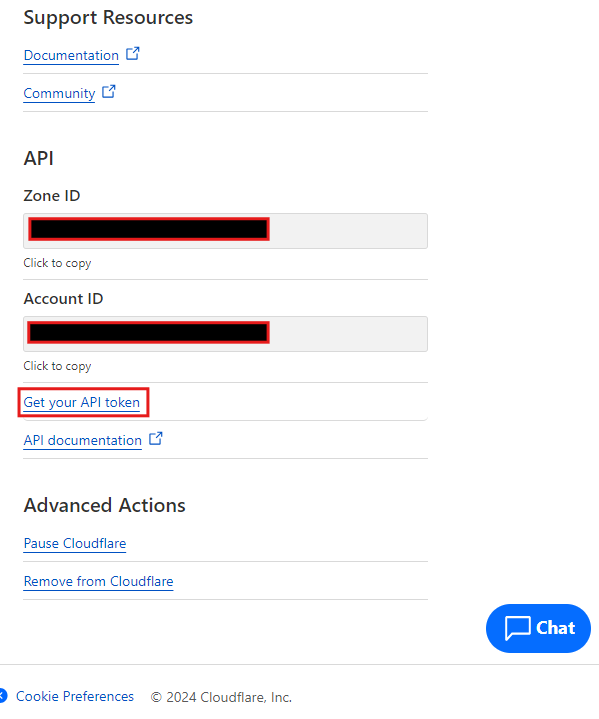
If you followed the steps in Securing your DSM – Tech Inhortum, you will have enforced 2-Factor Authentication for all administrator users. You need to login to your DSM with certman and activate the 2FA. As you have disabled connections to all apps for this account you will get an error message that you are not allowed use this service, you can ignore that. Next you have to add the following command with SSH:
export SYNO_Device_Name="CertRenewal"This will cause the script to ask for your 2FA token and then it registers the DID of the Synology NAS and ensures that the automatic process can continue.
Next we will get the first certificate:
./acme.sh --server letsencrypt --issue -d "*.YOURDOMAIN.NAME" --dns dns_cf --home $PWDAs this is a DNS challenge it will take longer than an HTTP challenge. It will create the DNS record, but it will take some time for the DNS record to be “activated” and be able to be seen by Let’s Encrypt. As you can see this will create a wildcard certificate. If you don’t want that, you can take the *. away before the domain name. Of course you have to use your own domain name here. The next command will tell Synology NAS to start using the certificate:
./acme.sh -d "*.YOURDOMAIN.NAME" --deploy --deploy-hook synology_dsm --home $PWDYour wildcard certificate should now be in the list of certificate and you can assign it as the standard certificate (Control Panel > Connectivity > Security > Certificate) or you can assign it to specific services.
The final step is to setup a scheduled task. Go to Control Panel > Service > Taks Scheduler. Click on “Create” > “Scheduled Task > “User defined script”. Give it the following settings. Task: [any name you want], User: [certman], Repeat: [Daily], User-defined script:
/usr/local/share/acme.sh/acme.sh --renew -d "*.YOURDOMAIN.NAME" --home /usr/local/share/acme.sh --server letsencrypt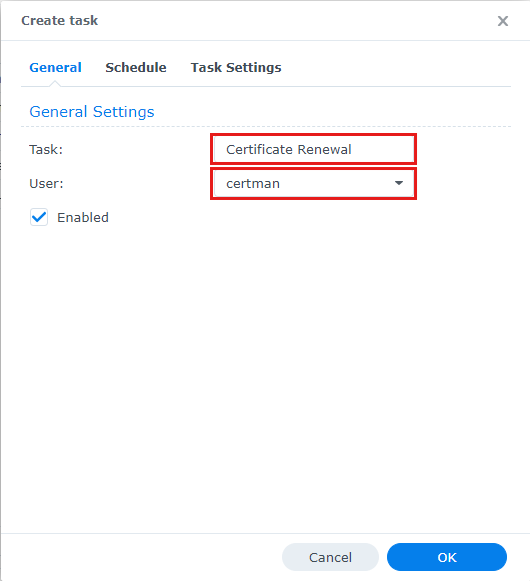

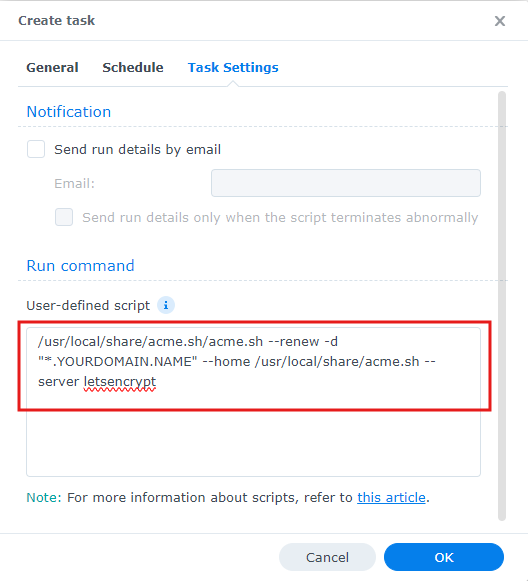
With this the task scheduler will check everyday whether the certificate needs renewing. Once the certificate is only 30 days or less valid, it will renew the certificate automatically.
If you haven’t done so you can now return to Step 2: Setting up Cloudflare – Tech Inhortum and set the encryption mode to full in Cloudflare. As you have a certificate the connection between Cloudflare and your router can now also be secure.