
Cloudflare is a global network and web performance company that provides services like content delivery, security, and domain name system (DNS) management. It acts as a reverse proxy between internet and your Synology NAS or server. They offer protection against DDoS attacks, speed optimization, and DNS services. Cloudflare is good DDNS because it allows you to automatically update DNS records when your IP address changes, ensuring uninterrupted access to your domain. And they have a free DNS management service.
Setting up your DNS in Cloudflare
After you have created an account with Cloudflare and you login, you can add your domain to your account by clicking on the “+ Add a domain” button.
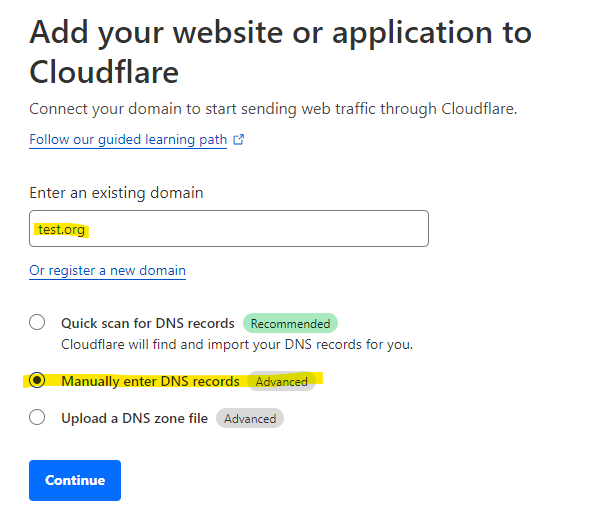
Fill in your domain name that you registered in step 1. You can fill in any name you want. Even domain names that have not been registered or are owned by other people. Here you are only adding the name to your account. Actually referring the domain name to Cloudflare happens later, and for that you need access to the DNS control panel of your domain name. Select “Manually enter DNS records”.
At the next page you need to select a plan for your domain name with Cloudflare. You can see the different options, but the free option is sufficient for a home-lab (and even for some demanding businesses). After clicking on continue you get to see the below page and you can add your first DNS record:
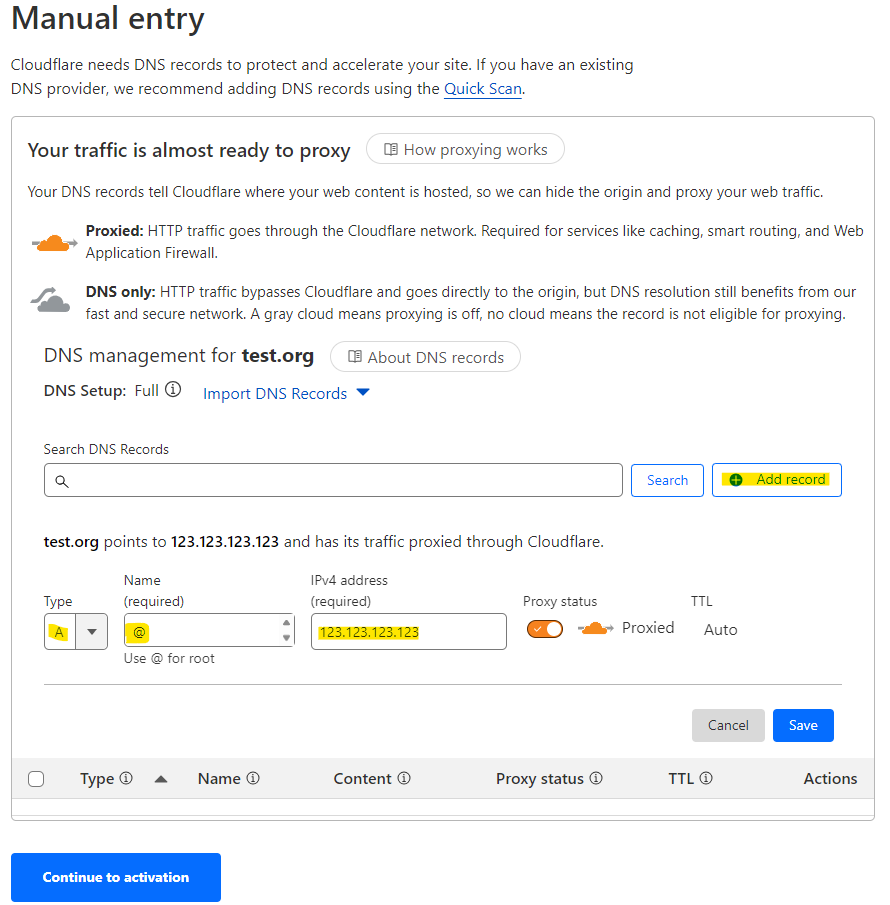
You select the record type as “A”, which stand for “Address Record”. Here you link the “Name” to the “IPv4 address”. In this case we fill in as name the “@” symbol, which stands for the root name (in our case test.org). This record now connects test.org to 123.123.123.123. You can also select an “AAAA” type, which stands for “Quad-A Record” and this one you use to register your domain name to an IPv6 address.
Enabling the “Proxy status”, will cause Cloudflare to protect your real IP address. This is one of the services that Cloudflare offers to protect your domain and your server. Cloudflare basically assigns an dynamic IP address to your record and proxies is to your real IP address. For most services this works great. For some services (like cloud access or mail-servers) this does not work and you need to switch off the “Proxy status”. The “TTL” cannot be changes when proxied. TTL stands for “Time to Live” and indicates to other DNS servers how long it should take before they should refresh their records.
For now this one record is sufficient to start. We will be adding more records, when we start using more services or subdomains. In order for Cloudflare to take care of your DNS you need to click on “Continue to activation”.
The next page explains how you can activate the Cloudflare DNS. It basically means that you need to tell your DNS registrar (where you have registered your domain name) to use the the DNS servers of Cloudflare instead of its own. Whenever someone looks up your registered domain name, in my case “Namecheap” will refer for the actual DNS records to the Cloudflare servers.
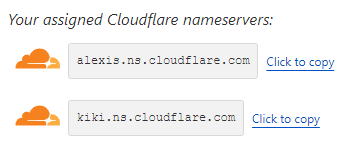
The 2 randomly assigned name-servers needs to be registered with your domain registrar. In this case “alexis.ns.cloudflare.com” and “kiki.ns.cloudflare.com”. In the DNS control-panel of Namecheap you can then fill in the name-servers:

Cloudflare connection to your router
The last step to setup and decide is how Cloudflare connects to your router. When you proxy the DNS, then Cloudflare generates a certificate for you which will secure the https connection. The connection from the proxied DNS to your router doesn’t have to be secured. Standard Cloudflare sets up the connection between Cloudflare and your router as http (non-secure). This does mean that you have to open port 80 on your router to allow the the non-secure http connection. For the non-proxied DNS entries, you would need to open port 443 on your router and provide a certificate yourself. As not all connections can be proxied, you would need a to provide your own certificate anyway. Therefore you might as well set the Cloudflare connection to your router as secured too. You do this under SSL/TLS settings under you domain name.
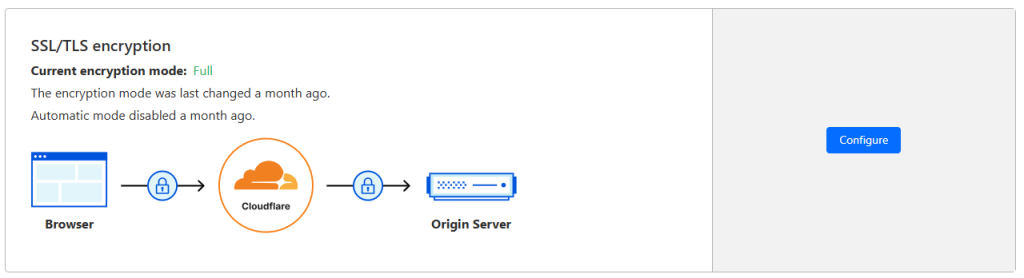
Make sure that the “Current encryption mode:” is set to full. If it doesn’t allow that, because you don’t have a certificate yet, then wait with this till you have finished Step 4: Getting a certificate for your NAS – Tech Inhortum. Forward port 80 from your router to your Synology NAS for now, until you have completed step 4. Return to Cloudflare and set the encryption mode to full and then close port 80 on your router.
Cloudflare is now setup to handle the DNS requests for your FQDN. The next step is to setup DDNS on your Synology NAS.