
Having setup your FQDN to work with the Cloudflare DNS servers, it is now time to setup DDNS on your Synology NAS. Natively Synology does not support Cloudflare as one of the DNS providers. You would have to run a script in SSH to enable and add Cloudflare as DDNS service provider. Even though this seems a convoluted way of doing it, the result is DDNS update that doesn’t fail. Unfortunately installation of the script has to be repeated every time you update your DSM.
Installing the script
Connect via an SSH client (Putty for example) to your Synology NAS and login with your administrator details. How to login with SSH and Putty look here. Type the following command at the prompt:
wget https://raw.githubusercontent.com/mrikirill/SynologyDDNSCloudflareMultidomain/master/install.sh -O install.sh && sudo bash install.shThis command downloads the script (install.sh) from a Github depository and executes that script. Which creates a PHP file that will communicate with Cloudflare and adds Cloudflare as a DDNS service to the list so you can select it in the NAS. Just remember this needs to be repeated every time the DSM is updated.
Get information from Cloudflare
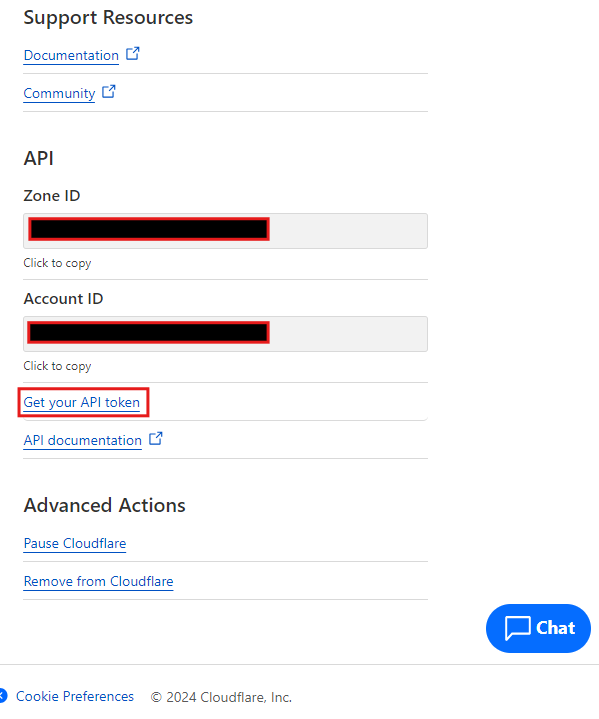
Before we can install the script we need some information from Cloudflare that is needed to update the DNS. In your Cloudflare account you need to create a so-called API key. Login to your Cloudflare account and click on your domain name (it should have a green tick and the word “active” behind it). Scroll down and on the right “Get your API token” link appears.
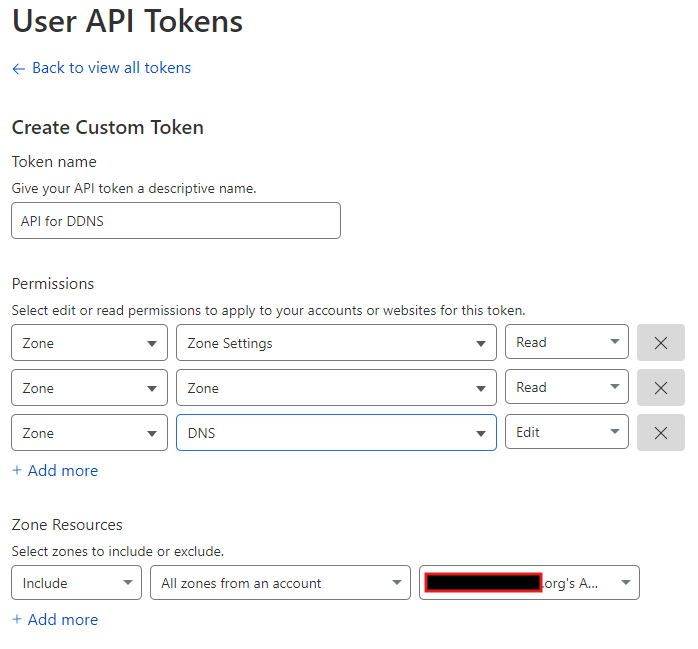
In the next screen click on “Create Token” and then get started with “Create Custom Token”. Give it a descriptive name and make sure the permissions settings are as follows:
- Zone > Zone Settings > Read
- Zone > Zone > Read
- Zone > DNS > Edit
Zone resources should be set as: Include > All zones from an account > [email]’s Account
This creates a token that you can copy at that time. You have to do that at this time, as it is shown only now! Copy the token in a safe place or once you are finished with setting up the DDNS in Synology you can delete the file with the copies token.
Setting up DDNS on Synology
Now it is time to setup the actual DDNS service on the Synology. Go to Control Panel > External Access > DDNS. Click on “Add” and select under “Service Provider” Cloudflare. Under “Hostname” you can fill anything as it is not used, but is required by Synology. Under “Username/Email” fill in your domain name. Under “Password/Key” copy the API key from the previous step. Then you can click “Test Connection” to see if it works. This should come back “Normal”. When you click on “OK”, the DDNS record is added and you will notice that your DNS in Cloudflare is updated too. You are now set to start adding services and servers to your Synology and use your domain name and subdomains to reach your services and servers.
DDNS with multiple domains
The installed script allows for multiple domains to be updated with the same IP address. Because in DDNS of Synology you’re only allowed to use the provider once. But by separating the different domain names with a pipe character (“|”) you can update the different domains of your Synology with your IP address.