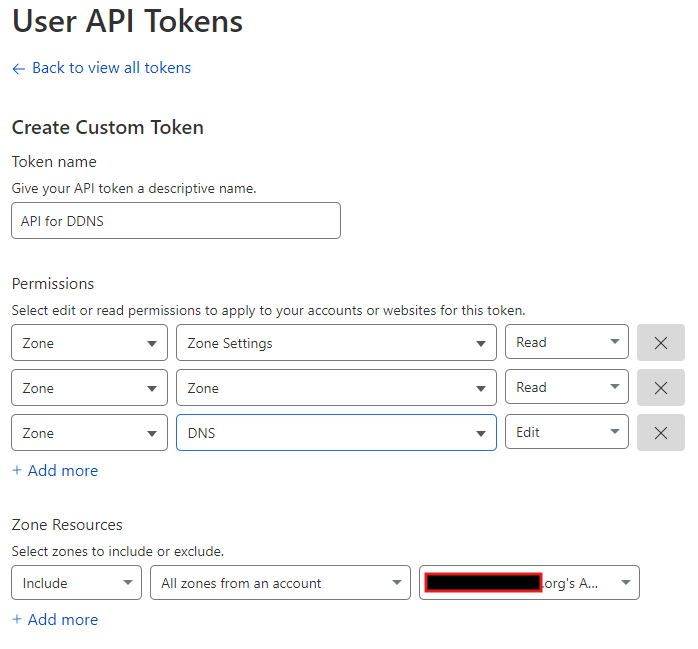
Create and retrieve the API keys from Cloudflare with the following settings:
Add Cloudflare to your DNS, seperate all your domains with a pipeline character (‘|’). You have to supply Hostname (can be anything), Username/Email (a list of your domains or one domain) and Password/Key (Cloudflare API token).
Creat an administrator account (user belonging to the administrator and http group), give only access to the folder homes, and deny access to all applications.
wget -O /tmp/acme.sh.zip https://github.com/acmesh-official/acme.sh/archive/master.zip
sudo 7z x -o/usr/local/share /tmp/acme.sh.zip
sudo mv /usr/local/share/acme.sh-master/ /usr/local/share/acme.sh
sudo chown -R certadmin /usr/local/share/acme.sh/
cd /usr/local/share/acme.sh
Provide the variables for each wildcard certificate (SYNO_CERTIFICATE provides the name of the certicate):
export CF_Token="your API key/token"
export CF_Zone_ID="your zone ID"
export CF_Account_ID="your account ID"
export SYNO_Username="certman"
export SYNO_Password="YOUR CERTMAN PASSWORD"
export SYNO_CERTIFICATE="Give a name for each certificate"
export SYNO_Create=1
export SYNO_Device_Name="CertRenewal"
Create a Scheduled Task in Control Panel > Service > Task Scheduler. Give it any name and execute the task under the new administrator user. Let the task run every day at a set hour. The content of the task is:
You can now close port 80 on your router and set Encryption mode in Cloudflare to full.
Start using subdomains to reach your Synology (Step 5 and step 6)
Create subdomains in your Cloudflare account by creating CNAME records referring to your root (@). Your root is updated via DDNS, so your CNAME record will automatically use your IP address.
You can set in Control Panel > System > Login Portal either a subdomain for your DSM – which will make your DSM accessible over port 443 via a Reverse-Proxy Server.
You can set in Control Panel > System > Login Portal > Applications subdomains for the general applications of your Synology NAS. All will be available through port 443 via Revers-Proxy. Just make sure all subdomains are created in your Cloudflare account with a CNAME record.